我就像很多人和熊一样曾经质疑PVC Figure是否真的卖的太贵,是否真的值得收藏。这次虽然没亲身参观PVC Figure工厂,但从Mikatan拍摄的照片里看见了PVC Figure复杂的制作过程。PVC Figure从模子里出来后就经过了层层的人手制作过程。每一个都费心费力,都是独一无二的精品(所以难免会有小瑕疵哦>o<)。虽是精品但也不是每个人都感兴趣收藏,且收藏目的和原因因人而异。对我而言,我看过许许多多的一流动画,虽有收藏高清DVD版但终究觉得少了些东西,少了些实在的东西。所以PVC Figure就能满足这方面的不足。凝望着PVC Figure的脸部表情,可爱的Pose,就能想起动画里的情节,还会暗里笑笑(拜托!买PVC Figure的人并不是变态和脑残哦)。但还是那一句吧,有多余的钱才买吧哈哈。:)
Tuesday, 29 May 2012
Friday, 18 May 2012
(转载) Mikatan's Factory Field Trip! - Part 3
以下将转载一篇PVC Figure的工厂参观及少许的制作过程,原文摘自于以下网页.
Author: Mikatan (All credit goes to Mikatan)
- Original Page Link -
-----------------------------------------------------------------------------------------------
Onto part three of the factory trip!
So far we have been though the creation of molds and the actual molding process!
"It really, really is just like a taiyaki mold...!"
It's getting old now, I know - but it really is the easiest way to think about it!

"Taiyaki? Huh?"
If you're wondering about that then you probably missed out on the first two blog entries - you should read them first!
Mikatan's Factory Field Trip! - Part 1
Mikatan's Factory Field Trip! - Part 2
Now we move on to the painting process!

The first thing that needs to be done to paint a figure is getting the right colors...
Here we have the color-mixing room!
Completely unrelated to the painting process, but I have to add that the factory had tons of the ventilation fans seen in the above picture. It really made it feel like a factory.

Mixing colors!
"T-That's a LOT of paint!"
I guess this is what you'd expect for mass production... if you're going to need to paint a lot of figures I guess you will need a lot of paint...
A large rod about the size of a wooden sword was used to stir up the paints and mix the colors.

These parts are going to be painted!
These are the little parts that were molded in the previous article .
All those parts have been neatly organized into their respective containers!

Painting Production Line!
The factory workers all work with air brushes to neatly paint the little pieces.
Let's take a closer look...
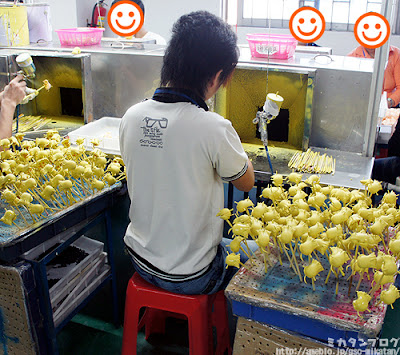
Looks like some hair is getting painted!
"It looks like each person works on something different...?"

First it's given a base coat...

Then a gradient is layered on top!
You can see in this picture the ends of the hair use a darker yellow to create a nice gradient effect.
You can also see they are all painted nearly identically!
Even though the painting is all done by hand and done very efficiently, each piece still comes out almost identical to the next! This is the same for hundreds and thousands of the same parts! The factory workers are amazing at what they do!!

Bananas...?!
Nope, these must be twin-tails!
Even small parts like these still have the same gradient painting used on them. I only showed the one hair piece, but in actual fact almost all of the parts go through the same process.

Lunch time! Let's invade the cafeteria!
The factory workers all get lunch made for them at the cafeteria!
The person wearing the apron on the far right serves everyone!

Looks delicious!
And it was delicious as well! I had no problem with Chinese food at all.
I'll get more into the food another time though.

So after filling up with lunch it's time to continue the factory expedition!
This is a 'mask'!
"And... what exactly is a mask? "
If you're not sure about that one...
A mask is something like this...

The molded part is covered with the 'mask' to prevent certain parts from getting painted!
That's pretty much how it works.

In this example, just the white bits showing through the mask will be painted.
That white bit is actually...

Part of a Nendo Petite!
To actually see how tiny they are is almost unbelievable. They are absolutely minute!
Anyway, basically certain parts on each figure are painted this way over and over again!

The buttons are also done with masks!
These are actually parts of a figma... you can see just how finely the painting is done!

Huh? Is this also a mask?
It looks kinda like a Nendo Petite... but it's... pink!
This is a mask for the mouths!
A separate mask is needed just for the little mouth painting! Incredible!
The masks are also wiped down once in every few products to make sure that the painting doesn't go off target. It's the little things like that which really help create high quality products!

There are also some masks that have little holes to insert things into -
For painting both sides at once!
It seems there are a bunch of different kinds of masks that can be used. But just what is going to be painted with the mask in this image?

Areas that can't be painted with a mask are painted with a brush!
"Things like Nendo Petite's shoes are hand- painted with brushes....they don't use masks."

Ah-hah!
So there are some really small parts that can't use masks...
It's like each figure is handmade!

Masks are being made inside this bathtub like thing!
"This is the Sea of Decay."
That's from Nausicaä!

Copper is placed into some acid in order to make the masks...
But I'm afraid I didn't really understand this part too well myself. I'll try make better sense of it next time!!

The one thing that surprising me the most was this!
The place for the joints of a figma are padded with something...?
They are padded like this is so that no paint can get inside the joint area!
This is done for each and every joint!
That's just incredible...
The blond haired character at the start of this blog also had this padding to make sure no paint entered the joints.

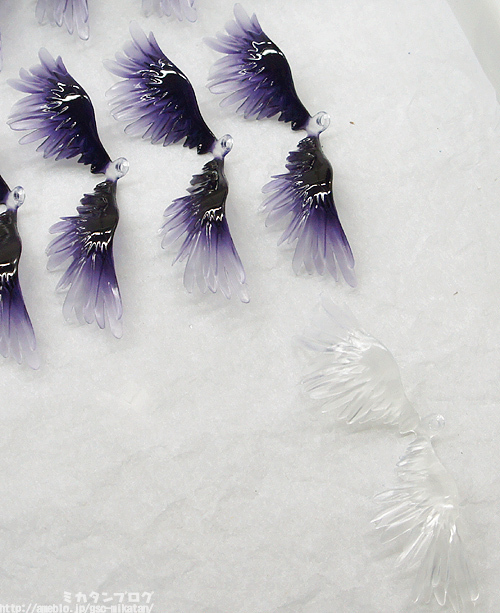
I was also really amazed at this!
The gradient painting of wings!

The unpainted clear parts are in the bottom right.
The painted ones use a single color!
It shows how beautiful gradient painting can be! Plus they do it so quickly!
I grabbed a video as well, take a look: (Oh no, video seems lost link!)

Sunset in China.
It's about time for the working day to come to and end.
Although, there is still lots for the manager and Gakkun to work through. They need to find more and more ways to make the process smoother and better for the best products possible!
To everyone at the factory,
Thanks for all the hard work you do!
It was great getting to have a look around the factory, and I manged to learn a lot!
To think how many people work together to bring you just one figure is absolutely astounding.
Simply put, I'm going to be taking even more care of my figures now!
Keep up the great work!!
The next factory tour we'll be looking at how the eyes are painted!
I'll continue these blogs on days that there are no new products to take a look at, so look forward to the next one!
Once again though, remember that this factory tour was looked at very quickly and simplified for me, and I'm sure the actual process involves a lot more jargon and specifics - I hope that my fellow workers and experts in the field will forgive the basic explanations.
That's all for today!
I'll see you all again tomorrow! (・∀・)ノ゛
Author: Mikatan (All credit goes to Mikatan)
- Original Page Link -
-----------------------------------------------------------------------------------------------
Onto part three of the factory trip!
So far we have been though the creation of molds and the actual molding process!
"It really, really is just like a taiyaki mold...!"
It's getting old now, I know - but it really is the easiest way to think about it!

"Taiyaki? Huh?"
If you're wondering about that then you probably missed out on the first two blog entries - you should read them first!
Mikatan's Factory Field Trip! - Part 1
Mikatan's Factory Field Trip! - Part 2
Now we move on to the painting process!

The first thing that needs to be done to paint a figure is getting the right colors...
Here we have the color-mixing room!
Completely unrelated to the painting process, but I have to add that the factory had tons of the ventilation fans seen in the above picture. It really made it feel like a factory.

Mixing colors!
"T-That's a LOT of paint!"
I guess this is what you'd expect for mass production... if you're going to need to paint a lot of figures I guess you will need a lot of paint...
A large rod about the size of a wooden sword was used to stir up the paints and mix the colors.

These parts are going to be painted!
These are the little parts that were molded in the previous article .
All those parts have been neatly organized into their respective containers!

Painting Production Line!
The factory workers all work with air brushes to neatly paint the little pieces.
Let's take a closer look...

Looks like some hair is getting painted!
"It looks like each person works on something different...?"

First it's given a base coat...

Then a gradient is layered on top!
You can see in this picture the ends of the hair use a darker yellow to create a nice gradient effect.
You can also see they are all painted nearly identically!
Even though the painting is all done by hand and done very efficiently, each piece still comes out almost identical to the next! This is the same for hundreds and thousands of the same parts! The factory workers are amazing at what they do!!

Bananas...?!
Nope, these must be twin-tails!
Even small parts like these still have the same gradient painting used on them. I only showed the one hair piece, but in actual fact almost all of the parts go through the same process.

Lunch time! Let's invade the cafeteria!
The factory workers all get lunch made for them at the cafeteria!
The person wearing the apron on the far right serves everyone!

Looks delicious!
And it was delicious as well! I had no problem with Chinese food at all.
I'll get more into the food another time though.

So after filling up with lunch it's time to continue the factory expedition!
This is a 'mask'!
"And... what exactly is a mask? "
If you're not sure about that one...
A mask is something like this...
The molded part is covered with the 'mask' to prevent certain parts from getting painted!
That's pretty much how it works.

In this example, just the white bits showing through the mask will be painted.
That white bit is actually...

Part of a Nendo Petite!
To actually see how tiny they are is almost unbelievable. They are absolutely minute!
Anyway, basically certain parts on each figure are painted this way over and over again!

The buttons are also done with masks!
These are actually parts of a figma... you can see just how finely the painting is done!

Huh? Is this also a mask?
It looks kinda like a Nendo Petite... but it's... pink!
This is a mask for the mouths!
A separate mask is needed just for the little mouth painting! Incredible!
The masks are also wiped down once in every few products to make sure that the painting doesn't go off target. It's the little things like that which really help create high quality products!

There are also some masks that have little holes to insert things into -
For painting both sides at once!
It seems there are a bunch of different kinds of masks that can be used. But just what is going to be painted with the mask in this image?

Areas that can't be painted with a mask are painted with a brush!
"Things like Nendo Petite's shoes are hand- painted with brushes....they don't use masks."
Ah-hah!
So there are some really small parts that can't use masks...
It's like each figure is handmade!

Masks are being made inside this bathtub like thing!
"This is the Sea of Decay."
That's from Nausicaä!

Copper is placed into some acid in order to make the masks...
But I'm afraid I didn't really understand this part too well myself. I'll try make better sense of it next time!!

The one thing that surprising me the most was this!
The place for the joints of a figma are padded with something...?
They are padded like this is so that no paint can get inside the joint area!
This is done for each and every joint!
That's just incredible...
The blond haired character at the start of this blog also had this padding to make sure no paint entered the joints.

I was also really amazed at this!
The gradient painting of wings!
The unpainted clear parts are in the bottom right.
The painted ones use a single color!
It shows how beautiful gradient painting can be! Plus they do it so quickly!
I grabbed a video as well, take a look: (Oh no, video seems lost link!)

Sunset in China.
It's about time for the working day to come to and end.
Although, there is still lots for the manager and Gakkun to work through. They need to find more and more ways to make the process smoother and better for the best products possible!
To everyone at the factory,
Thanks for all the hard work you do!
It was great getting to have a look around the factory, and I manged to learn a lot!
To think how many people work together to bring you just one figure is absolutely astounding.
Simply put, I'm going to be taking even more care of my figures now!
Keep up the great work!!
The next factory tour we'll be looking at how the eyes are painted!
I'll continue these blogs on days that there are no new products to take a look at, so look forward to the next one!
Once again though, remember that this factory tour was looked at very quickly and simplified for me, and I'm sure the actual process involves a lot more jargon and specifics - I hope that my fellow workers and experts in the field will forgive the basic explanations.
That's all for today!
I'll see you all again tomorrow! (・∀・)ノ゛
Thursday, 17 May 2012
(转载) Mikatan's Factory Field Trip! - Part 2
以下将转载一篇PVC Figure的工厂参观及少许的制作过程,原文摘自于以下网页.
Author: Mikatan (All credit goes to Mikatan)
- Original Page Link -
-----------------------------------------------------------------------------------------------
Time to continue our factory trip!
Yesterday I went through the making of the molds.
"So it's pretty similar to a taiyaki mold!"
... if that's how you're thinking about it, then you've got the right idea!
Remember that there are two kinds of molds though, the iron plate that cooks the taiyaki and the taiyaki itself.
Today we'll look more into how the final mold - the actual sculptures, are created!

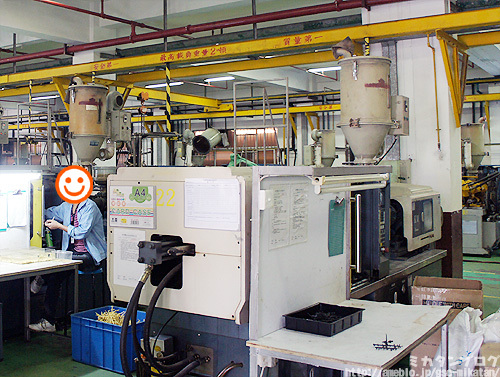
This is the machine that does the work!
You can't really see much from this angle though... it kind of just looks like a metal box...
There are actually a number of these machines all lined up in a row here.


Author: Mikatan (All credit goes to Mikatan)
- Original Page Link -
-----------------------------------------------------------------------------------------------
Time to continue our factory trip!
Yesterday I went through the making of the molds.
"So it's pretty similar to a taiyaki mold!"
... if that's how you're thinking about it, then you've got the right idea!
Remember that there are two kinds of molds though, the iron plate that cooks the taiyaki and the taiyaki itself.
Today we'll look more into how the final mold - the actual sculptures, are created!
This is the machine that does the work!
You can't really see much from this angle though... it kind of just looks like a metal box...
There are actually a number of these machines all lined up in a row here.

But there is a little chimney thing on top of the metal box!
Here the raw materials are added!
For the taiyaki example this would be batter, but in the case of figures the main raw material is PVC!
So in other words, PVC is poured into this little chimney thing!

This is how the machine looks inside!
I'm pretty sure it's not a good idea to try putting your hand inside on of these.

Ah! A mold!
One of the molds from yesterday is placed inside the machine!!
At this point the different sides of the mold are placed on either side, apart from each other.

Just like a taiyaki mold would be before you pour in the batter!

Close up the yellow cover, and...
The molding begins!
I can't take photos of it in action, so I'll just explain it in steps:
1) The two sides of the mold connect together!
2) The PVC is poured into the machine, which pours it into the mold!
3) The mold is cooled, causing the PVC to harden!

Molding Complete!
"Eh? What the heck is that weird rod thing?"

The rod is called the "runner", which is formed by the cracks that the PVC has to travel through!
When the two sides of the mold are put together and the PVC is run through them, the PVC has to travel between the red lines in the photo in order to reach all the different parts of the mold. The position of the runner can have an impact on where the PVC reaches in the mold, so it requires quite a lot of planning to make sure the figure comes out with all the right details.

These are all the parts after the runners have been cut off!
The factory workers use cutting tools to cut the runners off carefully. The parts are then placed in water...
This is to make sure they don't melt or lose shape in the heat!
The PVC is melted at an incredibly high temperature and then cooled to make it harden, however it still comes out quite hot when the cooling process is complete! At the point that is has just been cooled the PVC is very weak to heat, so they are quickly placed in water to make sure they keep to the correct shape.
What do you think those parts in the top left container are...? They look a little bit like the hair that sticks up on some Nendoroids.

Here some figma stands getting cut!
The stands have finished the molding process and are now being cut out one-by-one. Be careful not to cut your hand!

PVC leftovers!!
"That makes one super surreal photo...!"

Complete!
Some brand new hair parts!
(・∀・)ノ
But we're not finished yet...

Little fixes with a craft knife!
Sometimes the cutting of the runner will leave little bumpy parts, so they are then carefully removed with a craft knife!
This worker even has a plaster on her thumb!
The workers really left a good impression on me - even after getting cut a little on the job they would plaster up and continue!

Onto the filing!
Even after the craft knife, the pieces still go onto a filing process to make absolutely sure there are no unwanted bumpy surfaces. There were lots of girls working in the factory, this was another one!

Then onto the cleaning!
The white plastic gets dirty very easily, so each piece is then wiped down with little swabs like these.
We have yet another girl working in this photo... I really didn't mean to just take photos of the girls, but it somehow ended like that. There were a lot of girls working there, though!
All the figures you all collect at home all go through all of this! (`・ω・´)ゞ
They might be mass-produced, but they still go through a lot of manual work!
I'll get into the painting at a later stage... it's even more work...
As a figure lover it was really interesting to go through the factory and see just how much work is put into the figures.

The parts are each displayed on a board!
Some of the parts are absolutely tiny, so they are displayed like this to make sure that none of the pieces go missing! Smart!

Good work, molds!
After the molding process is complete all the molds are numbered and put into storage.

Names can even be written on the molds!
Any idea what this says?
It's Chinese for "Black Rock Shooter!"
Although I'm not sure why there is a "Q" at the start...
And that's it for the molding process!
So along with yesterdays blog I've now covered both parts of the molding process.
There are a lot of mechanized parts to the process, but I was quite surprised at the amount of manual work as well. It's wonderful to know how much work is put into the figures that I display all over back home.
The next factory tour will cover the painting process!
I'll continue these blogs on days that there are no new products to take a look at, so look forward to the next one!
Once again though, remember that this factory tour was looked at very quickly and simplified for me, and I'm sure the actual process involves a lot more jargon and specifics - I hope that my fellow workers and experts in the field will forgive the basic explanations.
That's all for today!
I'll see you all again next week! (・∀・)ノ゛
Wednesday, 16 May 2012
(转载) Mikatan's Factory Field Trip! - Part 1
以下将转载一篇PVC Figure的工厂参观及少许的制作过程,原文摘自于以下网页.
Author: Mikatan (All credit goes to Mikatan)
- Original Page Link -
-----------------------------------------------------------------------------------------------
The start of my 5-day trip to China!
During my absence the blog was taken over by various others who introduced some figures they were in charge of. It was a lot of fun reading some other people's blogs! (Thanks all of you!)
December 1st was also the released sate of the new Monster Hunter!
"Yaaay!
Managed to grab Monster Hunter and I've remembered my PSP...
China is going to be a load of fun now!"
I thought my preparations were perfect, but then when I got to Narita Airport....
"I... forgot my laptop!! "
Unbelievable.
As soon as I realized the whole world started going black before me... I was really hoping it would just magically appear in front of me. In the end Enon delivered it to me via car... I had actually already missed the boarding time for my flight, but a big thanks to ANA, who were kind enough to let me on anyway!

...and so, after that panic...
I arrived in China!
It was my first time in China, and I really liked the look of all the houses and stores lined up along the street. Of course the signboards and menus were all 100% in kanji, so I never really understood them entirely, but at least I had a faint idea of what was going on around me.
I also found the driving to be a bit on the violent side, in the short time I was there I even saw an accident. It seems like if you dawdle along the road a little too much they might just crash into you without a second thought.

Anyway, let's head into the factory!
As we passed by the meeting room...
Oooh! Look at all the treasures... err... samples on the table!
Gakkun from the production department came along with me on this trip. These samples were for him to take a look over. The production team actually comes to China fairly often, so they can check for any inconsisitincies that might be occuring and communicate directly with the factory.
Solving the problem before it occurs, saves a load of time!
Thus the products are judged right where they are made.

Let's take a look at the production line!
We'll take a look all over the place, but first...
Let me differentiate between the two different meanings of 'mold'.
The figures that we all have back home are made with mold, but are in fact molds themselves, in other words a mold is both
1) A container into which liquid is poured to create a given shape when it hardens.
2) A sculpture produced by molding.
Let me make an example using taiyaki.
Both of these are molds:
・ The iron plate that cooks the taiyaki
・ The taiyaki itself.

Keep that in mind as we go on! Today we'll be focusing on the first meaning!

These are what the molds look like!
They're huge! They also look big and heavy like gold bars.

Ooh! Something came out!
Looks like a hair part has come out successfully!!
If you pour in plastic where the arrow is it will come out as the fringe parts here!

The final adjustments are done by hand!
A lot of care is needed to make sure the mold creates the right shape of the figure.
Without these final adjustments we would never get the same amount of detail on the figures.
As you can see the mold here is coating in red paint - the reason behind this is to show where the adjustments have been made. In other words, as they finish each bit it will be painted in red.

And these machines cut the molds!
The huge machines carve out the iron plates used for the molds.

Here you can see it in action!
This will create the basic internal shape of the mold.

Smaller molds are placed together!
Lots of smaller molds are all put together on a large metal plate here. It's like a puzzle!!

Solved!
Just like a taiyaki mold, the mold comes with two sides.
This image only shows the one side.
When there is more than one mold put together like this, the plastic is poured into where the arrow is pointing here, which will let it flow into all of the molds. Think about how a model kit looks before it is put together - all the pieces are connected by small pieces of plastic - it's the same as that.

These ones are tiny! What are they!?
"They look strangely familiar...."

What's going on here...?
Apparently it's time to move a mold!
The ceiling is covered in a rail which has chains attached, so heavy molds can be moved along the rails after having a chain attached to them.

Everyone seems to be smiling about the work... but...
Each mold weighs around 200kg!
( But that's just approximate, obviously if differs with each mold )
It wouldn't be nice to have that drop on your toe!!!!

"So, it's been moved now...
But now he's hitting it!! "
I had no idea what was going on here at first!
This is adjusting the point that the molds connect!
Let's go back to the taiyaki example!
A taiyaki mold is made to create the outline of a fish, and will be made in two separate halves. It's made like this so that the filling can be added easily, but when you put the two together you will always end up with a "seam" where you joined the two parts together.

For figures, this seam is called the 'parting line'.
Obviously, the less visible this line is on figures, the better!
The parting line is created by where the two molds connect.
In other words, the two molds can't just simply be placed together, they have to be carefully coordinated to make sure the line is in the right place.
And that's it for today's explanation!
We've finally come up to the point where we have a mold ready for making figures!
Next up we'll take a look at actually creating the figures - the other kind of 'mold'!
This factory tour was looked at very quickly and simplified for me, and I'm sure the actual process involves a lot more jargon and specifics - but I hope that my fellow workers and experts in the field will forgive the basic explanation.
That's all for today!
I'll see you all again next week! (・∀・)ノ゛
Subscribe to:
Posts (Atom)