Sunday, 9 September 2012

[Animation] Atchi Kotchi - あっちこっち


是泉此方吗(看过Lucky Star的就知道她是谁)? 这是初次看这动画时的疑问。。。真的很难想像四格漫画能够有如此突破和认真制作(当然也有不少原四格漫画变成好看的动画哦)!人物设定方面是很好,人数也刚好且各有各的性格。看了后只觉得很可爱,很温馨,很搞笑,很想重看哈哈。女主角会适时长出猫耳和猫尾,这。。这好萌哦(不是萝莉控哦)。故事就很简单,所以想在众多同类动画突破真的不容易。我是很推荐看哦,娱乐性是很不错,人啊是要常笑日子才好过哦!


片頭歌「 あっちでこっちで 」- 御庭摘希(大久保瑠美)
歌曲是伴随着欢乐和可爱气氛,我是觉得一般。 ;3

片尾歌「 手をギュしてね 」- 御庭摘希(大久保瑠美)
歌曲很可爱哦!!还能感觉淡淡的恋爱在进行着,朋友以上,恋人以下就是这种暧昧关系吧。我是推荐哦。

Wednesday, 5 September 2012

[Animation] Another - アナザー


“MISAKI就在那裡,MISAKI並沒有死。”就这句话,灾厄就从此开始了。
或许本来只是自私不舍的离别,强行在言语和思念上留下不该留下的人,谁知竟然造成后辈们的无妄之灾。这动画看似简单但却意外的复杂。这恐怖类的动画我觉得源自于诅咒,若是诅咒就该有解诅咒的方法,关键是过程。复杂方面是在于寻找“不存在的人”,其设定非常接近无迹可寻,虽是已死的人但却拥有活人的特征,甚至自己也不晓得自己已死亡,唯一可能确认他们的是他们可能有某段的记忆失去了(应该是他们死亡的那段记忆失去了吧)。动画里解诅咒的方法更是令人左右为难。在看完这部动画后觉得这诅咒的机制设定很棒!是可以延续很久同时也非常值得看哦。动画素质很高,营造出来的恐怖气氛也不错,眼尖的观众也许很早就发现谁是“不存在的人”了哦哈哈。强力推荐必看哦!!


片頭歌「凶夢伝染」- ALI PROJECT
歌曲有着紧张感以及快节奏,像是在暗喻着尽快找出“不存在的人”以快速解决这一切。

片尾歌「anamnesis」- Annabel
歌曲有着安详宁静感,歌声也很优美,像是在安慰动画里枉死冤魂。闭上眼睛,用心体会这一首优美旋律的歌曲吧。必听神曲哦!!

Monday, 3 September 2012

[Animation] Ano Natsu de Matteru - あの夏で待ってる


科幻+青春爱情的校园动画。刚看的时候觉得有些像Anohana,人物,绿色小镇等等的美好感觉。很着重于描述爱情,感情事都围绕在五个人身上,感情事描述我觉得拿捏的很好,不多也不少,就刚刚好。情绪表达也很好,给人感觉温馨又苦涩。想得到些感情上一二事的参考不妨看看哦。或许会有感同身受的感觉。本人觉得爱情能让人不知觉的成长,感情路上成败不须太过在意,人总该抱着希望在人生路上前进,或许也应该自私些,至少一定要为自己而活,当然如能找到愿意一同走人生路的人就必须珍惜。是沉重但未必不是好事哦。我是很推荐看哦。

片頭歌「 sign 」-Ray
歌曲有着轻松节奏,像看着翠绿美景被凉爽微风吹拂般舒服,不错。

片尾歌「 ビードロ模様 」-やなぎなぎ
歌曲同样有着轻松节奏,歌声优美更增添其感觉。像是一对情侣在夏天夜里看着天上繁星,表面上如四周一般乌黑寂静,但内心是温暖舒服的,认真听后觉得有此意境,必听神曲。

Monday, 6 August 2012

[Animation] K-On! - けいおん!


刚开始看这动画时,说实在是没多大的期待(因为类似的动画很多。。嘻嘻)。谁知这也是一匹深藏不露的千里马!以轻松,快乐的校园生活描素这五位各有特色的乐队成员。天真贪吃且有天然呆的平沢唯,外表成熟但内向怕羞的秋山澪,阳光型女孩且有点男子气的田井中律,温柔大方且善于照顾人的大小姐的琴吹紬,最后就是个子小小但态度认真的中野梓。这部动画的漫画版是四格暴笑漫画,实在难以想像它能变得如此好看。除了能带来娱乐欢笑以外,还能看出成员之间的感情深厚,说真的是很感人的哦。加上“放学後TEA TIME”演奏的歌曲也非常动听。所以不自觉的看了又看。真期待Season 3的K-On!。必看哦哈哈。

片頭曲「Cagayake!GIRLS」- 樱高轻音部- 平沢唯(主唱)
轻快活泼的摇滚片頭曲 , 整体来说是不错的哦!

片頭曲「GO! GO! MANIAC」- 放学後TEA TIME- 平沢唯(主唱)  - 第1話 - 第13話
轻快活泼的摇滚第二季片頭曲1 , 整体来说觉得一般。

片頭曲「Utauyo!!MIRACLE」- 放学後TEA TIME- 平沢唯(主唱)  - 第14話 -第27話
轻快活泼的摇滚第二季片頭曲2 ,  整体来说还是感觉一般。

片尾曲「Don't say "lazy"」- 樱高轻音部- 秋山澪(主唱)
Mio-Chan的这首歌真的非常动听哦!虽有厚重的摇滚背景音乐,但整体节奏感很好。Mio的歌声是成熟型,相比Yui可爱型歌声我是较欣赏Mio的歌声。必听哦此歌!!! 

片尾曲「Listen!!」- 放学後TEA TIME- 秋山澪(主唱)- 第1話 - 第13話
Mio-Chan的第二季片尾曲1,曲风有些搞怪活泼,有放学後TEA TIME的感觉哦哈哈。不错!

片尾曲「NO,Thank You!」-  放学後TEA TIME- 秋山澪(主唱)  - 第14話 -第27話
除了Don't say "lazy"以外,这首也是K-On!里最爱歌曲之一!!由轻音乐带入接着摇滚这感觉我觉得很好,像是告诉我们放学後TEA TIME的实力大大加强了。让人不由自主的跟着唱!!此歌也是必听哦!

Friday, 20 July 2012

[Animation] Fate/Zero - フェイト/ゼロ


命运系列动画的设定我是觉得非常棒的。由7名召唤师和他们所召唤的7名英灵战斗。最后剩下的就能向圣杯许下任何愿望。每位英灵都有所属的职业级别,分别是剑士(Saber),枪兵(Lancer),弓手(Archer),魔术师(Caster),暗杀者(Assassin),骑士(Rider)和狂战士(Berserker)。所谓英灵像是英雄人物,可以是正派也可以是反派。或许我很喜欢历史英雄人物,我对命运系列里的英灵非常着迷,且让我看见了Gilgamesh,这半人半神英雄王的英姿。Fate/Zero的动画质量等各方面都很好。只恨Saber战斗少了些,Fate Stay Night里的Saber战斗比较多,但故事发展我觉得有些拖泥带水,且不大喜欢Saber的召唤师(但是剧场版就非常好看哦,而他也变得很强,强烈推荐必看)。动画里的“圣杯”虽有着神圣的名字但我觉得并非神圣之物。许下的愿望是有代价的。所以动画里也劝告着不可能不劳而获,必先劳其筋骨才能实现。

Thursday, 12 July 2012

雪糕公民 - Citizens of Ice-Cream


迟来的评价及介绍,迟了多少年都已不重要,重要的是我仍然记得你们! ;)
雪糕公民来自马来西亚,成员外表可能平庸(别扁我哦)但对音乐怀有独特的热诚(赞美哦) , 因而创造出独一无二的音乐。独特的音乐和对音乐的热诚是能从音乐中感受出来。
音乐如同拥有灵魂,在为创造者说出心里渴望的梦想及自由。

众多曲子里独喜欢"THE END","Leave it to the Ants"也是非常动听,就交给蚂蚁吧!
对曲子的评价我可不多说了,雪糕公民的音乐是要靠自己去感受,用心来感受。
尝试听听吧,或许你心灵能找回曾遗忘的梦想及自由。

感谢雪糕公民创造出一系列触动灵魂的音乐 。

14 July 2012, 9:00pm, The Actors Studio @ Lot 10. - 与他们见见面吧 ;) 。

Thursday, 28 June 2012

(转载) How Millhiore F. Biscotti was Made Using 3DCG Sculpting!


以下将转载一篇有关3DCG做PVC Figure的文章
Author: Mikatan (All credit goes to Mikatan)
- Original Page Link -


From DOG DAYS:

Millhiore F. Biscotti!
As I mentioned in the last post, today we’ll be looking at how the 3DCG data for the figure was made!
We’ll be taking a look from the very start of things! I’ll also be going into a bit of detail, so I think it’ll make for quite an interesting read!

Of course the one who told me all about it was Oda-P, who was in charge of Millhi’s sculpting!

Alright, let’s get into it!!


(1) Deciding on a Character (Planner)
Today’s model is of course DOG DAYS’ Millhiore F. Biscotti.
Nowadays you’ll hardly ever find an anime series, movie or game that doesn’t make use of 3DCG, but the data used for those is specially created to focus on movement. On the other hand, the 3DCG data for figures just needs be sculpted from clay into a fixed, non-moving model . That’s the main difference between common 3DCG and the 3DCG used for figure sculpting. Someone who can work with standard CG, knows the physique and build of the human body and also understands just what makes things ‘moe’ could easily work with a figure making team. We’ll go through the whole process that the director of the project goes through to reach the final product.

Ooh! As expected of Princess Millhi! That face at the bottom left is adorable!
So… we’ll use this illustration to make some 3DCG data?


(2) Modeling (3DCG Developer)
At first, the figure’s pose is not set in stone, so many ‘bones’ and joints are placed into the data based off the original illustrations of the characters, so that the pose can be easily changed at a later stage.
This 3DCG is made to be movable!


(3) Deciding on a Pose (Planner)
This time around, the pose was based on a scene from the ending!
Now we move back onto the modeling, using the pose we decided on.
Yes! A wonderful pose that really brings out the cute side of the Princess!!


(4) 3DCG Sculpting Stage #1 (3DCG Developer)
The original illustration didn’t feature the lower half of her body, so that part is simply done without a basis illustration. Eventually a first run of the 3DCG data is created, which will look something like the above.
Ah! She moved into her pose!
Although she still seems a little stiff…?
Ooh! Lemme see!!


(5) Adjustments to the Pose in #4 (Director)
The most common changes are adding in extra bends and twists.
It needs to be a smooth pose, but also one that brings out a dynamic feeling.
First the most obvious changes from the original illustration are brought up. In this case it was the way the hips were twisting – but changing that means changing all sorts of other things as well.

Checking poses using a figma!! ((((゚Д゚)))
I-I must admit, it does make it much easier to see the problems now!! (By the way, yhis Ayanami-san is Oda-P’s own personal figure.)


The pose features the right shoulder in front of the left, which means the right leg needs to further forward than the left one.

→ Which means, the left leg will have the most weight on it, so the left side of the pelvis should be placed higher than the right side.
→ Which means, the left shoulder should be lowered and the right shoulder should be higher so that the stomach area is bent horizontally.
→ This allows for the left and right sides to balance out with bends in the right place, creating a smooth, dynamic feeling.


The overall feel of the figure is also taken a look at here, and sometimes has some changes made on a larger basis too.
Getting all the changes right is the toughest part for the figure director. Here are the actual instructions that came with these images ↓

The twisting of the hips is definitely one of the most noticeable points of the illustration, and we’ve got a feeling for how the legs should look because of that now.
The left leg will be put out forward, putting most of the weight on it, meaning the left side of the pelvis should be raised, which in turn will require her left shoulder to be lower so the body looks like it is bending correctly. Even if you look at the illustration, I think the right shoulder does look higher than the left. I also think the angle of the hip should be tilted a little further, so that the right side of the hips is lower – if that causes the right foot’s toes to touch the ground, you’ll need tilt the foot back a bit more. The body as a whole also looks a bit long – perhaps it’s just a problem of perspective?


W-Wow…!!

It certainly shows that you need some feeling as to how the human body moves when doing this direction!


(6) Sculpting Adjustments (Director)
While the previous changes were more looking at physical errors, these are changes that need to be done as they differ from the original work.
So even areas like the inside of her skirt are all carefully directed to match up how they should – there really is no room to miss anything while doing this!


(7) 3DCG Sculpting Stage #2 (3DCG Developer)
After this point, you’ll start feeling the dynamic feeling that we are aiming for.
The pose really starts pulling together, and the 3D data is checked on once again. The whole model is spun around, so that it can be seen from any possible angle – to make sure there is nothing strange happening at certain angles.
The skirt is definitely a noticeable change – it’s much bigger now and looks a lot closer to the final figure I showed on the blog on Wednesday! You can also see the changes in the way the hips are turning now!


(8) Sculpting Adjustments (Director)
This is the final note of any more adjustments that need to be made. The biggest problem at this point was where exactly the legs should be inside of the skirt. Most of the instructions were to try and make it noticeable that the legs really are beneath the skirt.
We’re really moving into the finer details now! This is where the smallest of changes can really turn a good figure into a great one!


(9) Printing Out the Face
Obviously the whole figure will be printed out eventually, but the most important part to check for early problems is the face. Often after this print-out, small changes such as the bevel of the cheeks are changed – they are very small changes, but they all come together in the end.
It goes without saying that we all want a perfect figure, but of course the face is always the first thing you notice on a figure!!

The photo makes the face look quite big, but the changes that are done really are incredibly tiny – this goes for the prototype of course, but also for every single one of the figures made in mass production to get to you!


(10) 3DCG Sculpting Stage #3 (3DCG Developer)
The 3DCG Data is complete!
The creases in the skirt, and the line of the legs is now much more noticeable.


(11) Parts Partitioning (3DCG Developer)
Separating the different parts for production would be very difficult by hand, but with 3D data it’s a simple task!
At least, that’s what you’d think… but actually, it can be rather troublesome.

I’m sure a lot of you know, but the figures are all made up of various parts that are put together at a later stage! These separate parts are the ones that are made at the factories in China – and by using 3D data, it’s considerably faster to separate the different parts and save some much needed time!

Millhi ended up with 47 actual parts, 2 metal rods to be placed inside the figure and 2 parts for her base!


- Summary -
You often hear people say that as more 3DCG sculptors come into the world, many actual hand working figure sculptors will fall away – and to a degree, I think that is correct.

3DCG is considerably faster to work with as you don’t need to worry about the putty drying, surface finishing or any other problems caused by hand-done work. This obviously means you can get a lot more work done in a specific amount of time.

However, those who have been making hand sculpted figure for years have the experience and the theory behind the final products which can really help in the development of the 3DCG works. A lot of sculptors starting straight with 3DCG modeling will often have a hard time getting the representation of the body right at first.

Based on that, I believe that the experienced figure sculptors should work with the 3DCG modelling specialists, in order to create figures that have the charms that come from both sides of the table, and I believe that will bring us into the new age of figure sculpting!

- Oda

So the 3DCG modelers and the the original sculptors can put their strengths together to create great figures and save time all at once!

I must say that the one thing that really stands out after hearing all this, is that…

The voice of the director is very important!
For example, I’m fairly certain that if I had been directing the changes after seeing the scarecrow Millhi instead of Oda-P… something rather different would have come out at the end… I think the ability to do that direction is one of those skills you obtain after doing hand sculpting for a very long amount of time. I’ve tried doing it myself before as well… and I can say that while it’s fun… it’s very hard, and quite intriguing!

Another thing I wanted to get through to everyone though this article:
In the end, a professional is always going to be needed!

Someone who can take the 3D print-out and clean it up, or even improve the way it looks with some hand-made adjustments. Another very important part that we didn’t really touch is that of the painting, which is a very strong point of the figure as well – all these things have to be done by hand!

There are also all sorts of parts to the making of this figure that I didn’t include in this – I was just focusing on the sculpting – but there is a lot of work put in by a lot of people for every single figure that is released. Next time I have the chance, perhaps I’ll take a look at some other points in the production process as well.

Wednesday, 6 June 2012

[Animation] CLANNAD - クラナド


CLANNAD在爱尔兰语里有家族的意思,跟这动画有着很密切的关联。男主角岡崎朋也来自一个破碎的家庭,跟一般人不同,家对他来说是个很想逃避且不想回去的地方。命运地遇上了一位能够细心体谅及了解他的女主角古河渚。渚的家庭环境跟朋也完全相反,父母和谐恩爱也很搞笑。两人的相遇都给了对方非常大的变化。这部动画是能够让你感觉家的温馨和欢乐。鲜少有完整描述的动画,也还好不拖泥带水,结局也非常感人。我发觉这部动画很擅长把季节的感觉带入动画里,如春季着重于开始,夏季是活力,秋季带忧愁和冬季带伤感和绝望。插曲和主题曲都非常动听,且感觉有寒意及悲哀。但整体来说是非常正面及好看哦。

片頭歌「メグメル」-riya
虽是快节奏,但不感觉格格不入,很好听哦。

片尾歌「-影二つ-」-riya
歌微带寒意但并不显悲哀,像重获希望似的。

TRUE END片尾歌「小さなてのひら」-riya
这首歌是神作啊,非听不可,即使为了这首歌也值得买,配乐一流,riya的歌声再把整首歌的意境升华到神级。闭上眼听听,想像动画里的完美结局,你就知晓音乐到底能把你带到哪个境界。我鲜少给于高评,但这歌真的能做到境界突破。非听不可哦!!!!

Tuesday, 29 May 2012

Mikatan's Factory Field Trip! - 白熊感想

我就像很多人和熊一样曾经质疑PVC Figure是否真的卖的太贵,是否真的值得收藏。这次虽然没亲身参观PVC Figure工厂,但从Mikatan拍摄的照片里看见了PVC Figure复杂的制作过程。PVC Figure从模子里出来后就经过了层层的人手制作过程。每一个都费心费力,都是独一无二的精品(所以难免会有小瑕疵哦>o<)。虽是精品但也不是每个人都感兴趣收藏,且收藏目的和原因因人而异。对我而言,我看过许许多多的一流动画,虽有收藏高清DVD版但终究觉得少了些东西,少了些实在的东西。所以PVC Figure就能满足这方面的不足。凝望着PVC Figure的脸部表情,可爱的Pose,就能想起动画里的情节,还会暗里笑笑(拜托!买PVC Figure的人并不是变态和脑残哦)。但还是那一句吧,有多余的钱才买吧哈哈。:)

Friday, 18 May 2012

(转载) Mikatan's Factory Field Trip! - Part 3

以下将转载一篇PVC Figure的工厂参观及少许的制作过程,原文摘自于以下网页.
Author: Mikatan (All credit goes to Mikatan)
- Original Page Link -

-----------------------------------------------------------------------------------------------

Onto part three of the factory trip!
So far we have been though the creation of molds and the actual molding process!

"It really, really is just like a taiyaki mold...!"

It's getting old now, I know - but it really is the easiest way to think about it!


"Taiyaki? Huh?"

If you're wondering about that then you probably missed out on the first two blog entries - you should read them first!

Mikatan's Factory Field Trip! - Part 1
Mikatan's Factory Field Trip! - Part 2

Now we move on to the painting process!


The first thing that needs to be done to paint a figure is getting the right colors...

Here we have the color-mixing room!

Completely unrelated to the painting process, but I have to add that the factory had tons of the ventilation fans seen in the above picture. It really made it feel like a factory.


Mixing colors!

"T-That's a LOT of paint!"

I guess this is what you'd expect for mass production... if you're going to need to paint a lot of figures I guess you will need a lot of paint...

A large rod about the size of a wooden sword was used to stir up the paints and mix the colors.


These parts are going to be painted!
These are the little parts that were molded in the previous article .
All those parts have been neatly organized into their respective containers!


Painting Production Line!
The factory workers all work with air brushes to neatly paint the little pieces.
Let's take a closer look...


Looks like some hair is getting painted!

"It looks like each person works on something different...?"


First it's given a base coat...


Then a gradient is layered on top!

You can see in this picture the ends of the hair use a darker yellow to create a nice gradient effect.

You can also see they are all painted nearly identically!

Even though the painting is all done by hand and done very efficiently, each piece still comes out almost identical to the next! This is the same for hundreds and thousands of the same parts! The factory workers are amazing at what they do!!


Bananas...?!
Nope, these must be twin-tails!

Even small parts like these still have the same gradient painting used on them. I only showed the one hair piece, but in actual fact almost all of the parts go through the same process.


Lunch time! Let's invade the cafeteria!
The factory workers all get lunch made for them at the cafeteria!
The person wearing the apron on the far right serves everyone!


Looks delicious!
And it was delicious as well! I had no problem with Chinese food at all.
I'll get more into the food another time though.


So after filling up with lunch it's time to continue the factory expedition!
This is a 'mask'!

"And... what exactly is a mask? "

If you're not sure about that one...
A mask is something like this...


The molded part is covered with the 'mask' to prevent certain parts from getting painted!
That's pretty much how it works.


In this example, just the white bits showing through the mask will be painted.
That white bit is actually...


Part of a Nendo Petite!
To actually see how tiny they are is almost unbelievable. They are absolutely minute!

Anyway, basically certain parts on each figure are painted this way over and over again!


The buttons are also done with masks!
These are actually parts of a figma... you can see just how finely the painting is done!


Huh? Is this also a mask?

It looks kinda like a Nendo Petite... but it's... pink!
This is a mask for the mouths!
A separate mask is needed just for the little mouth painting! Incredible!

The masks are also wiped down once in every few products to make sure that the painting doesn't go off target. It's the little things like that which really help create high quality products!


There are also some masks that have little holes to insert things into -
For painting both sides at once!

It seems there are a bunch of different kinds of masks that can be used. But just what is going to be painted with the mask in this image?


Areas that can't be painted with a mask are painted with a brush!

"Things like Nendo Petite's shoes are hand- painted with brushes....they don't use masks."


Ah-hah!
So there are some really small parts that can't use masks...

It's like each figure is handmade!


Masks are being made inside this bathtub like thing!

"This is the Sea of Decay."

That's from Nausicaä!


Copper is placed into some acid in order to make the masks...
But I'm afraid I didn't really understand this part too well myself. I'll try make better sense of it next time!!


The one thing that surprising me the most was this!

The place for the joints of a figma are padded with something...?
They are padded like this is so that no paint can get inside the joint area!

This is done for each and every joint!

That's just incredible...

The blond haired character at the start of this blog also had this padding to make sure no paint entered the joints.


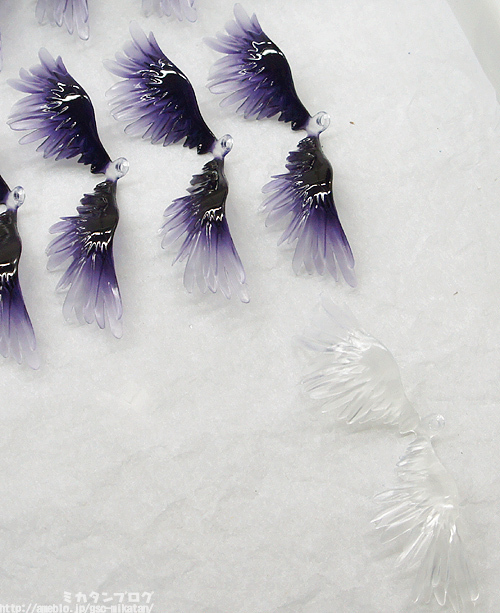
I was also really amazed at this!
The gradient painting of wings!


The unpainted clear parts are in the bottom right.
The painted ones use a single color!

It shows how beautiful gradient painting can be! Plus they do it so quickly!
I grabbed a video as well, take a look: (Oh no, video seems lost link!)


Sunset in China.
It's about time for the working day to come to and end.

Although, there is still lots for the manager and Gakkun to work through. They need to find more and more ways to make the process smoother and better for the best products possible!

To everyone at the factory,
Thanks for all the hard work you do!

It was great getting to have a look around the factory, and I manged to learn a lot!
To think how many people work together to bring you just one figure is absolutely astounding.

Simply put, I'm going to be taking even more care of my figures now!

Keep up the great work!!

The next factory tour we'll be looking at how the eyes are painted!

I'll continue these blogs on days that there are no new products to take a look at, so look forward to the next one!

Once again though, remember that this factory tour was looked at very quickly and simplified for me, and I'm sure the actual process involves a lot more jargon and specifics - I hope that my fellow workers and experts in the field will forgive the basic explanations.

That's all for today!
I'll see you all again tomorrow! (・∀・)ノ゛